Visible crew/equipment: After the airplane rescue, at Rampart when Brackett congratulates Roy and Johnny on a job well done, the outline of the mic transmitter is visible on the front, left side of Roy's shirt, just above his belt.
Visible crew/equipment: When the doctor shows up at the house of the man who kicked in his TV, as the camera moves back, the top of equipment (presumably the boom mic) is visible and moving in the reflection of the mirror on the wall.
Visible crew/equipment: When Johnny and Roy are working on the man who is unconscious due to electric shock, the bulging outlines of the lavalier mic transmitter and wire are visible on the back left side of Johnny's shirt.
Visible crew/equipment: When Roy and Johnny are at the laundromat with the drunk man, the bulging outline of the mic transmitter is visible on the left side of Johnny's shirt, over his belt.
Visible crew/equipment: When Charlie, who has smoke inhalation, is placed on the gurney in the treatment room, the actor's white tape mark is visible on the floor, where the nurse stands in a moment.
Camera Bug - S4-E10
Visible crew/equipment: At the accident scene with the truck carrying dynamite, when Roy is leaning over the driver's door, the outline of the mic transmitter is visible on the back, right side of his shirt. Then, when they're carrying the driver to the top, Johnny's becomes visible at his left side.
Camera Bug - S4-E10
Visible crew/equipment: When Johnny is driving Roy nuts by taking closeup pictures of him checking the squad's engine, the outline of the lavalier mic wire is visible on Johnny's back.
Camera Bug - S4-E10
Visible crew/equipment: At the school fire, when Johnny is administering the O2 to the teenager with smoke inhalation, the bulging outlines of the mic transmitter and wire are visible on the back, left side of Johnny's shirt.
Visible crew/equipment: When all the guys are talking to Mr. Gibson, who is stuck in the trench he fell into, the outlines of the lav mic transmitters are visible on the backs of Roy's and Johnny's shirts.
It's How You Play the Game - S4-E19
Visible crew/equipment: When Roy and Johnny are on scene at the car accident, the bulging outlines of their mic transmitters and wires are visible on the left sides (above the belts) of their shirts.
Visible crew/equipment: When Johnny and Roy are at the home of the pregnant woman who was shot, the bulging outline of the mic transmitter is visible on the back, left side of Johnny's shirt.
Daisy's Pick Blind Date - S4-E7
Visible crew/equipment: When the unconscious little boy is loaded into the ambulance, we see the actors' chalk x marks on the ground, where Roy, the boy's father, and mother are all standing.
Visible crew/equipment: After Cora is rescued from the cactus patch, when Harry annoys her and tells her to keep a stiff upper lip while she's lying on the gurney, the reflections of crew members and two reflector screens are visible on Harry's red bike helmet.
Visible crew/equipment: When Johnny and Roy help Cora crawl along the ladder from the cactus patch located in a secluded area, just as Johnny tells her to take it nice and slow, the camera moves a bit too far to the left and then shifts back to the right, but not before we are able to see a crew member, equipment and a large patio-style umbrella.
Visible crew/equipment: When Roy treks across the ladder to get to the woman in the cactus patch, the outlines of the lav mic transmitter and wire are visible at the back, right side of Roy's shirt. Then, when Johnny's on the Biophone with Rampart, the outline of the mic transmitter is visible at the back, left side of Johnny's shirt.
Visible crew/equipment: At the liquor store shooting site, when the second gurney is loaded into the ambulance, the outlines of the mic transmitter and wire are visible on the back, left side of Johnny's shirt.

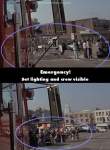
Visible crew/equipment: After the sniper surrenders, Captain Stanley instructs Engines 12 and 51 to come to the rear of the building, and a few shots later the camera moves alongside Engine 12 as it's turning the corner. In this specific shot, up ahead we are able to see set lighting (including moleeno-style array lights), equipment, crew and actors (in the blue paramedic uniforms), some sitting on chairs in front of the parking attendant's booth (which was shot at by the sniper during the scene).
Visible crew/equipment: After the police officer is shot by the sniper, when Roy and Johnny run with their equipment and duck down behind the squad car, the outlines of the mic transmitter and wire are visible on the back of the Sergeant's shirt, as Johnny and Roy are given flak vests.
Visible crew/equipment: When Roy and Johnny are with the sick dancer at the bar, the outlines of the mic transmitter and wire are visible on the back of Roy's shirt.
Visible crew/equipment: When Station 51 responds to the photographer who fell in the lion's pit, the outlines of the lav mic transmitters and wires are visible on the backs of Johnny's and Roy's shirts.


Answer: I believe you are speaking of the old man, Mr. Wilson. He's played by J. Pat O'Malley.
Bishop73
Correct, it was J. Pat O'Malley...he also played the grandfather with his grandson when their rocket exploded, and also played "Old Bill" in the episode with Ann Prentiss, where Gage saves the little girl from the burning tree house, and her mother falls in love with him.