Visible crew/equipment: When the photographer is getting a picture of the princess, you can see the shadow of the boom mic on him.
A Death Worse Than Fate (2) - S1-E10
Visible crew/equipment: After the opening credits, in Commissioner Gordon's office, a white tape mark is visible on the floor near the corner of Gordon's desk, where Chief O'Hara is sitting, then Gordon walks over to his mark. (00:02:55)
A Death Worse Than Fate (2) - S1-E10
Visible crew/equipment: When Zelda releases blindfolded Harriet at the street corner, there are two curved chalk actors' marks on the ground beside Harriet's feet. (00:08:35)
A Riddle a Day Keeps the Riddler Away (1) - S1-E11
Visible crew/equipment: During the first scene in Commissioner Gordon's office, the microphone shadow is outlined on the front of Chief O'Hara's uniform. (00:01:50)

A Riddle a Day Keeps the Riddler Away (1) - S1-E11
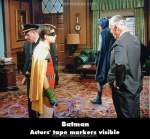
Visible crew/equipment: After the opening credits, during the scene in Commissioner Gordon's office Gordon tells Chief O'Hara to assign an extra squad, and numerous white tape marks are visible on the rug as the actors walk around. (00:06:15)
A Riddle a Day Keeps the Riddler Away (1) - S1-E11
Visible crew/equipment: After Batman tells Robin to look up the address for the Royal Mushroom Club, when it cuts to Riddler's hideout a chalk T-mark can be seen on the floor near the wall opening, where Mousey will stand in a moment. (00:12:15)
A Riddle a Day Keeps the Riddler Away (1) - S1-E11
Visible crew/equipment: While King Boris is being held as a pawn by Riddler, when Batman and Robin show up the duo jump over a crate, and the chalk T-mark is visible on the floor by Robin's feet. (00:21:05)
When the Rat's Away the Mice Will Play (2) - S1-E12
Visible crew/equipment: While Bruce Wayne is in Commissioner Gordon's office, when the Batman imposter shows up, numerous white tape marks are visible on the rug, where the actors will step as the scene progresses. (00:14:20)
When the Rat's Away the Mice Will Play (2) - S1-E12
Visible crew/equipment: After the Batman imposter has met Bruce Wayne in Commissioner Gordon's office, when it cuts to the imposter returning to Riddler's hideout, the chalk T-mark and another mark are visible on the floor near Mousey's feet. (00:16:25)
When the Rat's Away the Mice Will Play (2) - S1-E12
Visible crew/equipment: While Robin is "fiddling with the atomic pile" up on the scaffolding in the Batcave, Commissioner Gordon calls Batman to ask if he'd been to Gordon's office earlier, and in the overhead shot of Gordon's office there are two white tape marks visible under the desk, with one at Gordon's feet. (00:17:45)
When the Rat's Away the Mice Will Play (2) - S1-E12
Revealing mistake: When Riddler and his Rats have been caught near the end, during the ensuing fight Batman throws one of the Rats, and as he goes flying across the room we can see the stunt wires. (00:21:55)
When the Rat's Away the Mice Will Play (2) - S1-E12
Visible crew/equipment: The microphone dips into the shot at the end, just as Aunt Harriet is kissing Dick and Bruce good-bye. (00:23:20)

The Thirteenth Hat (1) - S1-E13
Continuity mistake: When Batman parks the Batmobile in front of Octave Marbot's studio, Batman tells Robin to activate the vehicle's anti-theft device. Robin is wearing green leather gloves, but in the closeup Robin's green glove is made out of a material (looks like cotton) very different than Robin's gloves. (00:18:15)
The Thirteenth Hat (1) - S1-E13
Visible crew/equipment: When Hatter is at Octave Marbot's studio posing as him, Batman and Robin arrive, and chalk T-marks are visible on the floor near Batman's statue in the studio. Then while Batman is in the dressing room, Hatter quietly opens the studio's front door, and more chalk T-marks are visible on the floor in the hall. (00:18:40)
The Thirteenth Hat (1) - S1-E13
Visible crew/equipment: As Gordon goes to the Batphone to alert Batman, the shadow of the camera covers most of him for about a full three to four seconds.
Batman Stands Pat (2) - S1-E14
Continuity mistake: Batman's plaster-covered costume gets an instant dry cleaning en route as he drives from the sculptor's studio to the batcave. (00:05:00)
Batman Stands Pat (2) - S1-E14
Visible crew/equipment: When Mad Hatter is sending Lisa in to butter up Mr. Bowinkle, the microphone shadow is bobbing up and down above their heads. (00:11:25)
Batman Stands Pat (2) - S1-E14
Visible crew/equipment: When Batman and Robin use the Batmobile's Detect-a-scope to locate Turkey's bowler, as Batman notes that Hatter's hideout must be in the old warehouse, the reflection of the boom pole/mic is visible at the right side of the Batmobile's bubble windshield. (00:16:55)
Batman Stands Pat (2) - S1-E14
Visible crew/equipment: When the Dynamic Duo trace Turkey's bowler to Mad Hatter's lair, they proceed to climb the wall. Then Hatter tells his goons to get into place for the trap, and in the next overhead shot there's a white chalk T-mark on the floor near Mad Hatter, at the right side of the screen. (00:17:45)
Batman Stands Pat (2) - S1-E14
Continuity mistake: When Batman and Robin break through Mad Hatter's window, several large chunks of glass remain attached to the wood frame. In the very next shot, they've vanished. (00:18:00)


Answer: There wasn't one singular city used. It was shot in and around various locations in California, plus on a lot of sets and backlots. Ex. Some scenes were shot in LA, some in Pasadena, some in Santa Barbara, etc.
TedStixon