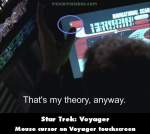
Revealing mistake: Right at 40:30, if you look in the top left corner of the LCD screen, you can see a mouse cursor. Six seconds later it starts to move around. It seems like someone noticed and tried to move it out of the scene. (00:40:30)

Continuity mistake: After Starling is beamed out of the limo, Rayne opens the door and escapes. The door is still standing open when the chauffeur starts the car. But in the reverse angle as he drives away, the door has closed itself. (00:20:10)

Visible crew/equipment: When the camera turns to face Tuvok as he approaches the crazed Hirogen, two stage crew members can be seen at the left side of the screen. The first is a rather plump man wearing what appears to be dark pants, and a short sleeve light shirt, while the second is squatting down in front of the first wearing shorts. (00:09:05)

Visible crew/equipment: After Paris hails Tuvok about the problem in the mess hall, a brawl breaks out. When the new Hirogen Alpha enters the galley to access the com relay, just as this Alpha removes the front panel in order to transmit a signal, the actor's green tape mark is visible on the floor. (00:39:00)

Visible crew/equipment: When the former Borg drones are awakened in sickbay, there's a pinkish T-mark visible on the floor behind Seven, at the bottom left corner of the screen. (00:19:10)

Visible crew/equipment: After Gotana-Retz pilots Orbital 1 back to his planet, it then cuts to the Voyager bridge. In a following shot, just as Tuvok says, "Life support is failing," the boom mic dips into view at the top left corner of the screen. (00:40:55)

Visible crew/equipment: During B'Elanna's turn as the EMH protagonist in the Doctor's holonovel, when mustached "Marseilles" (Tom) enters the room, there are two red T-marks on the floor near the door. Then during Neelix's version as the EMH, when "Captain Jenkins" (Janeway) orders "Tulak" (Tuvok) and "Kymble" (Kim) to take the EMH for reprogramming, white T-marks are visible on the floor. (00:11:40 - 00:15:15)

Pathfinder - S6-E10
Deliberate mistake: When Barkley goes to see Admiral Paris at Starfleet Command, as Nicole tells the Admiral that Barkley won't go away, there's a photo of the Admiral's son, Tom, on the desk. Tom's Starfleet combadge is at his uniform's right side (it should be on his left). But during the conversation there's a closeup of this photo, and Tom's combadge is now at his left side. This is not a flipped shot. The combadge position in the photo was not edited in the 1st shot, though it was corrected in the 2nd shot. (00:24:00)


Answer: If you include the original Star Trek series (1966) then there are several. The communicators used in the original series were before (and said to inspire) mobile phones. We currently do have teleportation technology but it currently only works on things the size of a few molecules. A "Cloaking device" also exists; it's a fabric that bends light through it, though it currently only works in infra-red. The Hypospray is real and was patented in 1960 - six years before the original series aired - it's actually called the Jet Injector. Faster Than Light travel is still a few decades off, but there are several real-world theories that look promising, including one that is remarkably similar to the method used in the Star Trek Universe called the Alcubeierre Drive that involves manipulating spacetime ahead and behind the ship and the ship "riding" it. Medical techniques and technologies have also advanced considerably; prosthetics particularity and we routinely have robots performing surgeries where absolute precision is needed. The "Shield" used in the series have a few primitive versions around. The Phasers used in the series are used but are not very powerful (nor will they ever be as powerful as the Star Trek version the laws of physics gets in the way) but rail-guns (using magnets to spin then propel a projectile) and particle accelerators like the Large Hadron Collider have been around for a while. The Replicator would require a nuclear fusion reactor and a nuclear fission reactor in something the size of a large oven and the Holo-deck wouldn't work at all based on our current understanding of physics so those are both still science fiction at the moment, but who knows!
Sanguis