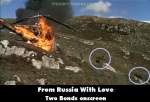
Visible crew/equipment: When James Bond shoots down the helicopter, then it crashes. He emerges from the rocks to run from the crash site to the right of the picture, just as you see Sean Connery emerge from behind rocks from the right in the same scene. So, for about a second, there are two James Bonds in the picture. One is the stuntman, and the other is Sean Connery. (01:38:05)
Visible crew/equipment: The first time Hilts (Steve McQueen) is locked up in the cooler, you can see the edge of the wall, and at the left a stage hand moving (this was visible in widescreen television broadcast; possibly also visible in other versions). (00:23:25)
Visible crew/equipment: When the hydra comes out of the cave,look closely at the ground. The track the hydra is being pulled across is visible.
Visible crew/equipment: When the speedy cabs close in on the hijacked taxi the camera crew is reflected in the side of the taxi nearest the camera.

Visible crew/equipment: When Culpeper attempts to hide his car in the garage, the two taxicabs catch up with him, prompting Culpeper to drive away. In the shot of Culpeper driving out of the garage and away from the others, the camera crew can be seen reflected on the side of his car. (02:24:20)